Why this guide exists
I wanted my AI agents to use a powerful Mac as a remote test box. The problem was not "can I turn on SSH?" That part is easy. The real problem was building a lane that was useful enough for remote QA, but narrow enough that I could trust it.
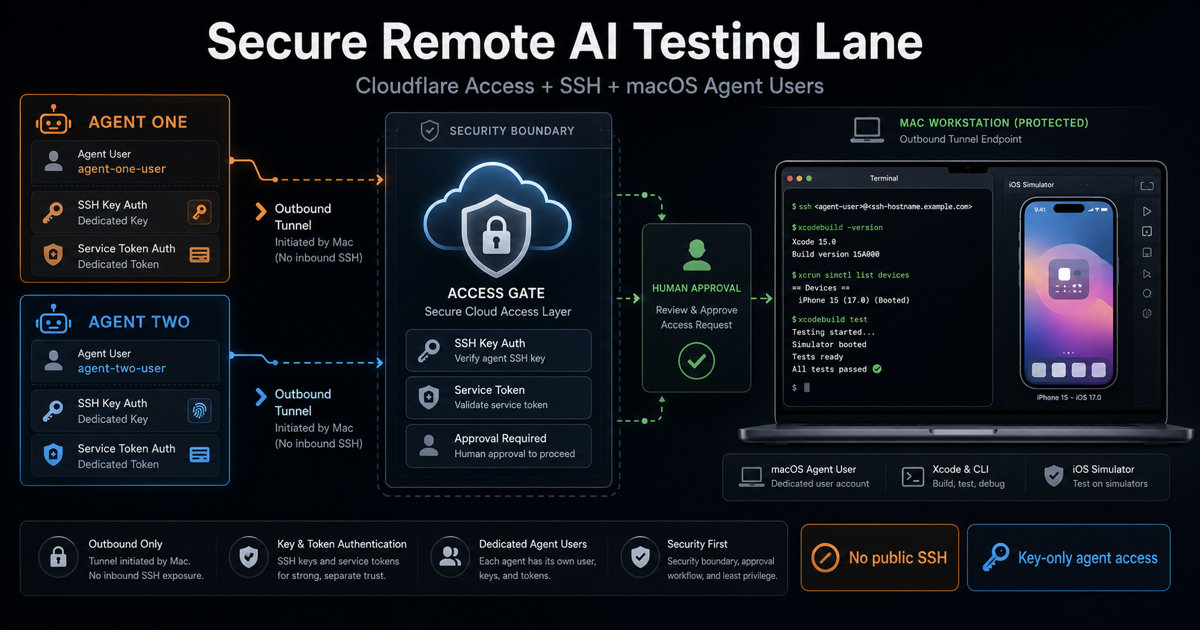
The route that worked was an outbound Cloudflare Tunnel with Cloudflare Access in front of SSH, separate local macOS users for each agent, separate SSH keys, and a final hardening pass so the agents could not casually inspect my private home folder or tool metadata.
The point: the tunnel is only one layer. The safer design layers Cloudflare Access, service-token identity, SSH key identity, dedicated macOS users, and local file boundaries.
Prefer to watch?
Here is the full walkthrough in video form:
What this system is
This is a controlled remote testing lane. It lets an approved agent connect to a Mac over SSH and run terminal-based development checks without exposing the Mac's SSH port to the public internet.
cloudflared access ssh.
Once the lane is working, an agent can run commands like whoami, hostname, xcodebuild -version, xcrun simctl list devices, simulator boot commands, screenshot commands, and assigned QA scripts.
What this system is not
This is not public SSH. It is not a permissionless agent box. It is not one shared account with every credential on the machine.
- Do not open port 22 to the internet.
- Do not rely on password SSH for agent accounts.
- Do not share your personal macOS account with agents.
- Do not make agent accounts admins by default.
- Do not use one shared service token for every agent.
- Do not store tunnel tokens or service-token secrets in a repo.
- Do not treat Cloudflare alone as the security boundary.
Important: Cloudflare Access is the outer gate. SSH keys and macOS permissions still matter.
The architecture
The clean version has five parts: the target Mac, the Cloudflare Tunnel, the Cloudflare Access application, dedicated local users, and SSH key-only login for those users.
Agent host
  -> cloudflared access ssh
  -> Cloudflare Access service-token policy
  -> Cloudflare Tunnel
  -> Mac localhost:22
  -> dedicated macOS user
  -> Xcode / Simulator commands
Public placeholders
This guide is sanitized. Replace placeholders privately on your own machine. Do not paste real values into chat, source control, screenshots, or public logs.
<target-mac>- the Mac that receives agent SSH sessions.<operator-user>- your personal macOS user.<agent-one>and<agent-two>- dedicated agent macOS users.<ssh-hostname.example.com>- Cloudflare-protected SSH hostname.<tunnel-token>- Cloudflare Tunnel connector token.<service-token-id>and<service-token-secret>- Cloudflare Access service-token values.<agent-key>- the agent private SSH key path on the client.
Step 1: run a read-only preflight
Before changing anything, inspect the Mac and the network. The goal is to learn whether SSH, Xcode, simulator tooling, Homebrew, and Cloudflare egress are viable.
sw_vers
uname -m
ssh -V
brew --version
cloudflared --version
nc -vz localhost 22xcodebuild -version
xcode-select -p
xcrun simctl list runtimes
xcrun simctl list devicesnc -vz cloudflare.com 443
nc -vz region1.v2.argotunnel.com 7844
nc -vz region2.v2.argotunnel.com 7844Operator note: UDP success is encouraging, but it is not proof. The real proof is a successful tunnel and a successful SSH session from a separate client.
Steps 2-6: prepare the Mac
Install cloudflared, enable Remote Login with a selected-user scope, create dedicated standard users, add each agent's SSH public key, and force those agent accounts to use key-only SSH.
brew install cloudflared
cloudflared --version
cloudflared tunnel run --help
Enable Remote Login through System Settings and choose selected users. Add your personal account plus the dedicated agent accounts.
dscl . -read /Groups/com.apple.access_ssh GroupMembership
nc -vz localhost 22
Create standard users through System Settings when possible. A CLI-oriented version looks like this, but review every command first.
sudo sysadminctl -addUser <agent-one> -fullName "Agent One" -password '<temporary-local-password>'
sudo sysadminctl -addUser <agent-two> -fullName "Agent Two" -password '<temporary-local-password>'

sudo dseditgroup -o edit -a <agent-one> -t user com.apple.access_ssh
sudo dseditgroup -o edit -a <agent-two> -t user com.apple.access_ssh
Each agent should create its own keypair on its own client. Only the public key gets copied to the Mac.
ssh-keygen -t ed25519 -f ~/.ssh/<agent-key> -C "<agent-one>@<target-mac>"
cat ~/.ssh/<agent-key>.pubsudo install -d -m 700 -o <agent-one> -g staff /Users/<agent-one>/.ssh
sudo sh -c 'printf "%s\n" "<PASTE_AGENT_ONE_PUBLIC_KEY>" >> /Users/<agent-one>/.ssh/authorized_keys'
sudo chown <agent-one>:staff /Users/<agent-one>/.ssh/authorized_keys
sudo chmod 600 /Users/<agent-one>/.ssh/authorized_keyssudo mkdir -p /etc/ssh/sshd_config.d
sudo tee /etc/ssh/sshd_config.d/200-agent-users.conf >/dev/null <<'EOF'
Match User <agent-one>,<agent-two>
PubkeyAuthentication yes
AuthenticationMethods publickey
PasswordAuthentication no
KbdInteractiveAuthentication no
X11Forwarding no
EOF
sudo sshd -tDo not disable password SSH globally unless you are ready to recover locally. The safer first move is to make only the agent accounts key-only.
Steps 7-10: build the Cloudflare lane
Create a Cloudflare Tunnel, run the first connector in the foreground, route a hostname to ssh://localhost:22, and protect that hostname with a self-hosted Access app.
printf "Tunnel token: "
stty -echo
read TUNNEL_TOKEN
stty echo
printf "\n"
export TUNNEL_TOKEN

cloudflared tunnel --no-autoupdate run --token "$TUNNEL_TOKEN"
In Cloudflare, route the protected hostname to the Mac's local SSH service:
Hostname: <ssh-hostname.example.com>
Service:  ssh://localhost:22
Then create a self-hosted Access application for the same hostname. For the first human proof, use a normal trusted identity policy and keep browser-based SSH/RDP/VNC rendering off unless you specifically need it.
ssh \
  -o ProxyCommand="cloudflared access ssh --hostname %h" \
  <operator-user>@<ssh-hostname.example.com>
Cloudflare should open a browser approval flow. After successful Access login, SSH should reach the Mac.
Step 11-13: move agents to service tokens
Browser login worked for a human, but it was too brittle for unattended agent CLI usage. The durable version uses one Cloudflare Access service token per agent, one Service Auth policy per token, one SSH key per agent, and one macOS account per agent.
Avoid the broad rule: do not use Any Access Service Token for this setup. Select the exact service token for the exact agent.
On each agent client, store only that agent's Cloudflare service-token values.
umask 077
mkdir -p ~/.config/mac-agent-lane
$EDITOR ~/.config/mac-agent-lane/cloudflare-access.env
chmod 600 ~/.config/mac-agent-lane/cloudflare-access.envexport TUNNEL_SERVICE_TOKEN_ID='<service-token-id>'
export TUNNEL_SERVICE_TOKEN_SECRET='<service-token-secret>'cloudflared access ssh --help | grep TUNNEL_SERVICE_TOKENset -a
source ~/.config/mac-agent-lane/cloudflare-access.env
set +a
ssh -i ~/.ssh/<agent-key> \
-o IdentitiesOnly=yes \
-o PreferredAuthentications=publickey \
-o PasswordAuthentication=no \
-o StrictHostKeyChecking=accept-new \
-o ProxyCommand="cloudflared access ssh --hostname %h" \
<agent-one>@<ssh-hostname.example.com> \
'whoami; hostname; xcodebuild -version; xcrun simctl list devices booted'
On an Apple Silicon Mac client with Homebrew, the proxy command may need /opt/homebrew/bin/cloudflared. On Linux, use command -v cloudflared and use the path that actually exists.
Step 14: run a real simulator smoke test
Once the agent can reach the Mac, test simulator control. A working setup is not just "SSH connected"; it is "the agent can run the toolchain it was given the lane for."
xcrun simctl list devices
xcrun simctl boot "<DEVICE-UDID>"
xcrun simctl bootstatus "<DEVICE-UDID>" -b
xcrun simctl io "<DEVICE-UDID>" screenshot ~/Desktop/simulator-smoke.png
ls -lh ~/Desktop/simulator-smoke.png
In the final proof, the agent connected through Cloudflare Access without browser approval, logged in as the dedicated macOS user, saw Xcode, ran simctl, booted an iPhone simulator, and captured a screenshot.
Step 15: make the tunnel persistent at login
The first proof should run in the foreground. Only make it persistent after the SSH lane is verified.
cloudflared service install <tunnel-token>launchctl print gui/$(id -u)/com.cloudflare.cloudflared | grep 'state ='
launchctl print gui/$(id -u)/com.cloudflare.cloudflared | grep 'program ='
Do not dump the LaunchAgent plist into a public log. It may contain the tunnel token. Also, brew services list may still say cloudflared none if Cloudflare installed its own LaunchAgent instead of a Homebrew-managed service.
Step 16: harden local file boundaries
After the lane works, audit what the agent users can see. In my setup, the private key and auth files were blocked, but some shell config and tool metadata paths were more visible than I wanted.
dscl . -list /Users UniqueID
dscl . -read /Groups/admin GroupMembership
dscl . -read /Groups/com.apple.access_ssh GroupMembership
stat -f '%Sp %Su:%Sg %N' /Users/<operator-user> /Users/<agent-one> /Users/<agent-two>sudo chmod 700 /Users/<operator-user>
sudo chmod 700 /Users/<agent-one>
sudo chmod 700 /Users/<agent-two>
chmod go-rwx /Users/<operator-user>/.zshrc 2>/dev/null || true
chmod go-rwx /Users/<operator-user>/.zprofile 2>/dev/null || true
chmod go-rwx /Users/<operator-user>/.zshenv 2>/dev/null || true
chmod go-rwx /Users/<operator-user>/.bash_profile 2>/dev/null || true
chmod go-rwx /Users/<operator-user>/.gitconfig 2>/dev/null || true
find /Users/<operator-user>/.codex -type d -exec chmod go-rwx {} + 2>/dev/null || true
find /Users/<operator-user>/.codex -type f -exec chmod go-rwx {} + 2>/dev/null || true
find /Users/<operator-user>/.claude -type d -exec chmod go-rwx {} + 2>/dev/null || true
find /Users/<operator-user>/.claude -type f -exec chmod go-rwx {} + 2>/dev/null || trueShared handoff lane: leave /Users/Shared available on purpose. Agents need a shared place, but they do not need your private home folder.
What broke and what fixed it
This setup did not work perfectly on the first try. The useful part was debugging each layer separately.
read -s -p pattern did not work cleanly in zsh. The portable stty -echo prompt fixed it.
cloudflared tunnel run asked for a tunnel name or ID until the token flag/env flow was correct.
ssh://localhost:22 and one Access app protecting the hostname.
cloudflared path.
Final verified state
The final state was the difference between "I opened SSH" and "I built an operating lane."
- The target Mac held a persistent user LaunchAgent for
cloudflared. - The tunnel started at login.
- The SSH hostname was protected by Cloudflare Access.
- Human access still required a trusted identity policy.
- Each agent had its own Cloudflare Access service token.
- Each agent had its own SSH key.
- Each agent had its own standard macOS user.
- Agent users were not admins.
- Remote Login allowed only selected users.
- Agent SSH was key-only.
- Xcode was visible to the agent accounts.
simctlworked over SSH.- One agent booted a simulator and captured a screenshot.
- Local file boundaries were hardened after verification.
Kill switches
Do not rely on only one kill switch. The point of this design is layered control.
# Stop the persistent tunnel
cloudflared service uninstall

# Check tunnel state
launchctl print gui/$(id -u)/com.cloudflare.cloudflared | grep 'state ='

# Remove an agent from Remote Login
sudo dseditgroup -o edit -d <agent-one> -t user com.apple.access_ssh

# Disable Remote Login entirely
sudo systemsetup -setremotelogin off- Disable the Cloudflare Access application.
- Remove the Service Auth policy.
- Revoke the agent service token.
- Rotate the tunnel token.
- Delete the tunnel route.
- Remove the agent public key from
authorized_keys. - Disable or delete the local agent account.
Final takeaway
The breakthrough was not Cloudflare by itself. The breakthrough was layering Cloudflare Access, service-token identity, SSH key identity, dedicated macOS users, and local file hardening into one controlled lane.
That made the Mac useful to remote AI agents without turning it into an open machine. For me, that was the moment the setup stopped being a hack and became a repeatable operating pattern.
My recommendation: prove the lane in the foreground, move agents to service tokens, verify the exact toolchain they need, then harden local boundaries before you call it permanent.